This is the first of a set of exercises.
In this exercise you will configure switch S1 so that it is in a well-defined state for the rest of the exercises. The configuration is stored in a file on the server and will be transferred to the switch using the Trivial File Transfer Protocol (TFTP) under the control of SNMP. (While the switch supports more secure FTP, we use TFTP here for consistency with the Load Balancer which does not support FTP.) You will use this process again in later exercises with different values of ccCopyFileName to load different configurations.
Checklist before you start:
- Check that you have installed the necessary Software on your computer
- You must have downloaded the MIBs listed with the description of the MIB Browser software
- You must have Booked a time to use the equipment
- Follow these instructions in order to connect to the testbed wifi network for the exercise. Usernames and passwords are case sensitive, and usernames start with a lowercase z.
- Remember that you will have to juggle between testbed and Uniwide WiFi connections
- Check that you have connectivity to the testbed by pinging 192.168.10.150 (a server) ((before 2014: 192.168.200.254 (the access point))) from your computer. If you receive no response, then try moving to a different location where the signal strength is better. Signal strength may change over time, so if you see a "request timed out" error, then repeat this test to determine if the signal is strong enough.
Steps:
- If you have problems with this exercise, then you might find an explanation in the longer description of this operation here: http://www.cisco.com/en/US/tech/tk648/tk362/technologies_configuration_example09186a0080094aa6.shtml
- Open the MIB Browser
In the main menu bar click "File" and select "Load MIB" to load CISCO-CONFIG-COPY-MIB and its dependencies.
Fill the following fields in the main window of the MIB Browser:
| Field | Value |
|---|---|
| Host | 192.168.200.1 |
| Community | telestudent |
| Write Community | telecourse |
which should appear as shown in the "MIB Browser main window" screenshot
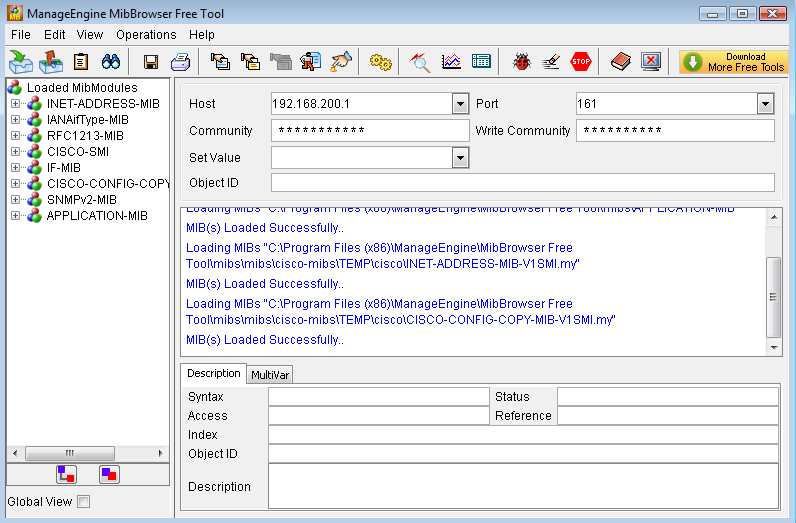
MIB Browser main window
Destroy any ccCopy table entry which may be left by a previous student by setting the .1.3.6.1.4.1.9.9.96.1.1.1.1.14.1 object (the ccCopyEntryRowStatus) to the value 6 (destroy).
Set the values of objects listed in the table below (they must be set in order from top to bottom in the table) to direct the switch to copy the configuration file from the server. Note that each Object ID starts with a dot, which is a convention required by the MIB Browser . Remember to direct the MIB Browser to Set the value (e.g. from the Operations menu or the hand-pointing-down icon) after entering the information for each object. The screenshot gives an example of the "MibBrowser setting ccCopyProtocol", but note that this screenshot is missing a ".1" from the end of the ccCopyProtocol OID.

| Object name | Object ID | Value | Explanation |
|---|---|---|---|
|
ccCopyProtocol |
.1.3.6.1.4.1.9.9.96.1.1.1.1.2.1 |
1 |
Defines the protocol to use: 1 = TFTP |
|
ccCopySourceFileType |
.1.3.6.1.4.1.9.9.96.1.1.1.1.3.1 |
1 |
Defines the source of the configuration file. 1=network file |
|
ccCopyDestFileType |
.1.3.6.1.4.1.9.9.96.1.1.1.1.4.1 |
4 |
Defines the destination of the configuration file. 4=running-config |
|
ccServerAddress |
.1.3.6.1.4.1.9.9.96.1.1.1.1.5.1 |
192.168.200.150 |
The IP address of the TFTP server. |
|
ccCopyFileName |
.1.3.6.1.4.1.9.9.96.1.1.1.1.6.1 |
vlan# where # is the last digit of your student ID, e.g. student z1234567 would use the value "vlan7" |
Name of the configuration file to be loaded. |
|
ccCopyEntryRowStatus |
.1.3.6.1.4.1.9.9.96.1.1.1.1.14.1 |
4 |
Creates a row in a table with the above elements and starts the transfer (4=createAndGo) |
You may then Get the value of the ccCopyState (.1.3.6.1.4.1.9.9.96.1.1.1.1.10.1) object to monitor the state of the transfer (1=waiting, 2=running, 3=successful, 4=failed). Wait or retry until the transfer is successful.
You have now configured the switch. There are no results that you need to obtain and report on for this exercise. This has just set you up for the next exercise about VLAN configuration.
Aside:
It may seem strange to use SNMP to set object values in order to initiate a file transfer which will essentially set the values of objects - why not just use SNMP to directly set the values of those objects? The reason for doing this is that the we can leverage 6 SNMP set operations to transfer a file which can then set the values of arbitrarily many objects. If you get tired of repeating 6 SNMP set operations in future exercises, then you can try using the MultiVar tab of the MIB Browser to set the values of multiple objects.

Multiple variables being set. This example shows setting variables for the the load balancer, but the multivar principle also applies to switch configuration.
To use multivar, select the tab “MultiVar” at the bottom on the window in the Mib Browser in order to send all the set requests within the same packet. Type the OID in the “Object ID” field and the Value in the “Set Value” field. Press “Add” to include the variable into the box. Perform the same operation with the other object values in the table. Then, to send the multivar set request, use Operation->SET in the main menu bar.